Battlemech painting process – 2nd Company
Over the last month or so, I’ve returned to the Battletech/Mechwarrior universe – I’d been a huge fan in the late 90s and early 2000s following Mechwarrior 2’s release, but had sort of “drifted away” during the long, empty years after Mechwarrior 4. Early attempts at returning with Mechwarrior Online had left me a bit cold; good as the game is at its core, it has an off-putting learning curve, and to my disappointment, is nowhere near as joystick-friendly as its predecessors. So somewhat less “sim-y” then.
It seems I’m fated to come back to Battletech in a big way this year, though. Two new computer game projects are on the horizon – a tactical, turn based game by Jordan Weisman’s (original Battletech creator) Harebrained Schemes (of Shadowrun fame) and a standalone singleplayer Mechwarrior 5 project from Mechwarrior Online’s Piranha Games. The latter project even promises to add VR gameplay into the mix. I say again – VR Mechwarrior!
The other cool developments involve the original board game – Battletech. It now has a popular quick-playing spin-off called Alpha Strike, that I’m very interested in playing, and the team at Catalyst Games has decided to redesign and re-release “the unseen” – a group of popular Battlemech designs (some among my favorites) that had been removed from the game because of copyright disputes (I am NOT going to cover THAT mess here.)
A previous attempt at redesigning them had resulted in designs that were of… mixed… quality, and that may be a bit generous. The current redesigns however, seem to perfectly toe the line between originality and keeping the “feel” of the classics. In some cases I might even argue the new designs are an outright improvement over the somewhat dated classics.
All of this has led to my returning to the game in a big way. A few years ago I had, even in my Battletech exile – picked up a new introductory boxed set to the game, and promptly set it aside, unplayed, and the miniatures inside tragically unpainted. Well, that has now changed. While my old Battletech minis languish somewhere in boxes at my parents’, I’ve started working on a new force – two Companies of Battlemechs (3 lances of 4 ‘mechs each) which will be painted and ready for combat very soon now.
ACTUAL PAINT TUTORIAL STARTS HERE
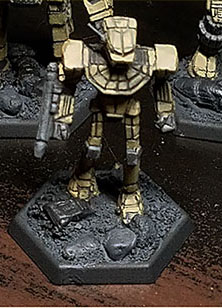
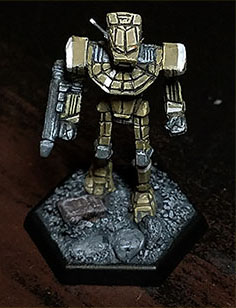
After showing my minis online – at the official Battletech forums, and at the Battletech Painting and Customs Facebook group, I was asked to document my process, and so here we are, with a quick step-by-step of my 2nd Company paint scheme, as applied to the Boxed Set’s Panther Battlemech.
NOTE about the hex bases I use: The various plastic Battlemechs being offered by Catalyst Games come with “half hex” bases which, though fine for the hexmap gameplay of the base game, cause problems when not using the hex grid; therefore, to keep things fair and even, I decided to “re-base” all my plastic ‘Mechs. This, and then prepping the bases, is enough of a topic that I think I will leave it for another day. I’ll concentrate on the ‘Mech itself for now.
STEP 0: Primer
Having assembled the ‘Mech (if it requires assembly, most plastic ones don’t) and basing it (see note above) I coated the whole ‘Mech with an even coat of Krylon Colormaster Black Ultra Flat Primer. These are Succession-War era ‘mechs with fairly desaturated color schemes so the black works well as an undercoat. Make sure to shake your primer can well before spraying!
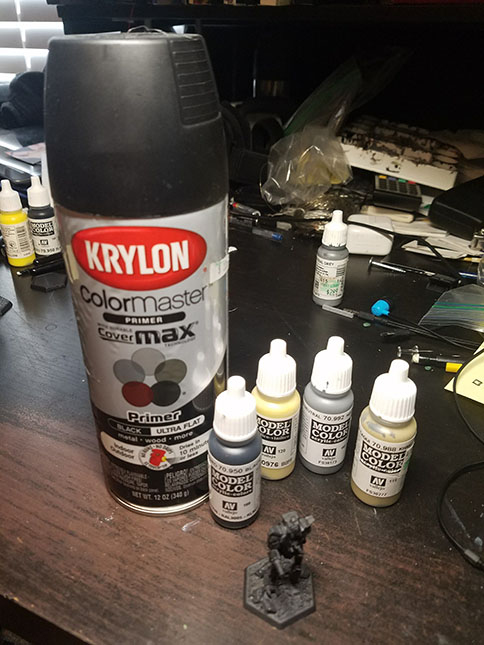
STEP 1: Base Color
The first thing I do is paint the ‘mech, head-to-toe, with its “main” base color. In this case, its Vallejo Model Color “Khaki”. This can be a fairly thin coat, and it doesn’t have to be particularly even; we’re just “setting the stage” for further layers. Keeping the paint a little watered down for quicker, easier coverage is probably a good idea.
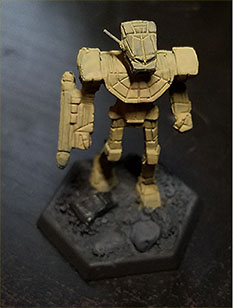
STEP 2: Details First Pass
In this paint scheme, I decided that areas where mechanisms where likely to be left exposed would be left “unpainted” (in universe) which meant painting them grey. I used Vallejo Model Color “Neutral Grey” for most details on the Panther (and 2nd Company in general). Same as before – flat, thin coat, maybe a bit watered down. Do NOT worry too much about precision! Don’t obsess if you accidentally paint “outside the lines” at this point. Believe me, there will be plenty of time for that later; at this point, we’re still doing setup.
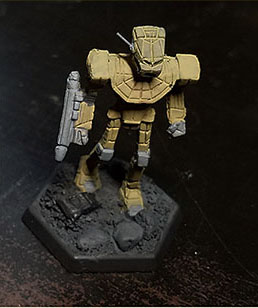
STEP 3: The Wash
Ok, now it starts getting interesting. One thing people have commented on is the dark “between the panels”. This is achieved with a dark “wash”- simply, very watery paint. My wash is actually very aggressive – more than one painter out there is probably cringing about how much I over-cover. The idea though is that the runny, dark paint (either black, or black mixed in with a bit of neutral grey) will flow into every little indent on the model and pool there. Because its so watery though, and because we painted the base colors under it, the lines and shadowed areas will not be perfectly black; they’ll show some trace of the color underneath, which is intentional.
Step 4: Cleanup
Well, now that we’ve covered the dark recesses, we can come back in with the base color. This time though, we want the paint to be somewhat drier, and we’re trying to paint only on the exposed facing of the panels – avoiding the recessed lines. By keeping the paint drier, we discourage it from flowing into the recesses. And actually, you might want to leave downward facing areas, the insides of joints, etc. without the cleanup so they retain the darker, “washy” look. We are creating the illusion of shadowed areas; though your models are 3d objects with their own real tiny shadows, the way light behaves over a 1 inch model is very different from how it would on a 30+ foot giant, which is why we are encouraging more contrast.
Do this for both the Khaki areas and the Grey details, with their respective colors.
Oh! And if you screw up and end up painting into a recessed area, don’t panic! Just let it dry for a minute, then hit it with a “mini wash”, basically a localized version of step 3, and try again. In fact, you might want to just keep going and then just do a “touch up” pass targeting all your mistakes at the end. Note that with the Panther, I hadn’t gotten enough dark paint into the upper head area, and ended up doing a touchup there.
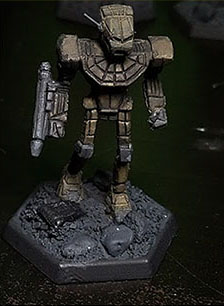
Step 5: Highlights and Details
By the end of step 4, the mini looks pretty passable. This step is what really gives it an extra bit of pop, though. First, highlights: the idea with highlights is to do the opposite of what you did with the wash. With a lighter color, the idea is to paint the most raised parts of the ‘mech – usually little details, or the edges around panels. To do this, we want to use as thin a brush as possible, with just a little bit of paint, lightly applied. In many cases, the best way to do this is by “drybrushing”: after dipping your brush in the paint, dab most of it off by “painting” on a paper towel or other absorbent material – then gently sliding your brush over the area you want to paint. If you get back into one of the recessed areas, or paint highlights that are too large, etc… well, NOW is the time to obsess.
See, I told you it was coming.
For 2nd Company, I use Vallejo Model Color “Buff” for highlights on the “Khaki”, and “Sky Grey” for highlights on the “Neutral Grey”.
To finish off the 2nd Company paint scheme, I selected a few areas that I thought could use more contrast or detail, and painted thin, white lines around them as I thought appropriate. You mileage may vary on this, and actually in a couple of cases I made massively bad decisions that I ended up painting over. Note: the white may need more than one coat to look opaque enough over the Khaki and Grey.
Final Thoughts:
For 2nd company, I chose to paint the bases grey; for the base, I painted it the same Neutral Grey with a dark wash, then drybrushed on some Neutral Grey, Neutral Grey mixed with a bit of white, and then sky grey, in that order. Each layer should cover less area and be done with a “dryer” drybrush than the last.
The Panther doesn’t have much of a cockpit, but if you’re painting ‘mechs with a larger cockpit, here’s what I’ve been doing: for each large area of glass, I’ve been painting it very dark brown or black (Model Color Black or Black mixed with Flat Brown), then painting the lower right corner with a combination of Model Color “Mahogany” and yellow; then somewhere on the opposite upper-right corner I’ll put a very tiny dot of pure white, to communicate the idea that it has a specular reflection (and this is made out of something like glass).
I hope this helps someone out there, and by all means leave any thoughts or questions in the comments!
****EDIT****
Ah! I forgot to mention – once you’re happy with your mini, it can be a great idea to give it a top coat! I use Testor’s Dullcote and so far its given me great results, though bear in mind that this will give you mini a “flat” appearance; there are glossy or satin top coats if you prefer those looks.

